


Author: Sharon Jang | Reviewer: Ian Denison | Published: 3 January 2025 | Updated: ~
Maintaining your wheelchair is important to expanding its lifespan and injury prevention. This page provides an overview on how you can keep your wheelchair in good shape.
Key Points
- Maintaining your wheelchair on a regular basis can help save money on repairs, extend the life of your wheelchair, and prevent injuries.
- Maintenance involves two aspects: checking to make sure your wheelchair is in good shape (inspections) and minor tune-ups.
- Maintaining your wheelchair is beneficial, but does not replace an annual wheelchair inspection by your wheelchair provider.
Regularly maintaining your wheelchair can help you save money from repairs, extend the life of your wheelchair, and prevent injuries. Some weak evidence research has found that individuals who did not regularly maintain their wheelchairs are over 10 times more likely to have a wheelchair-related accident. Knowing what to do when your wheelchair malfunctions may provide you with more independence and reassurance when travelling. Although more complicated and technical maintenance should be left to a wheelchair maintenance expert, there are many things you can do at home yourself.
Maintenance schedulingThe numerous maintenance tasks listed in this article may seem overwhelming. This article goes over many aspects of your wheelchair to inspect and covers multiple maintenance tasks to be completed. Completing all of these tasks in one go may require a lot of time and energy. If this is not feasible for you, try breaking up the monthly maintenance items into different weeks. For example:
|
| Tool | Image | Purpose | ||||||||||
| Wrench | 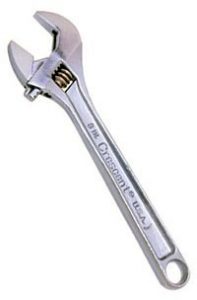 | To turn nuts and bolts or to prevent them from turning when loosening or tightening. | ||||||||||
| Lubricant (e.g., graphite, PTFE/Teflon) |  | Lubricates moving parts and prevents them from corroding. | ||||||||||
| Screwdrivers (with various heads) |
| Used to undo or tighten screws on a wheelchair. | ||||||||||
| Hex keys (Allen keys) | 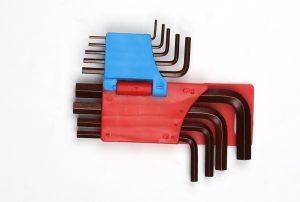 | Used to turn sockets with a hexagonal head. You will either need metric or imperial hex keys, depending on your wheelchair. | ||||||||||
| Tire pumps |  | Standing tire pumps are recommended as they are needed to pump tires up to over 50 psi. | ||||||||||
| Tire levers | 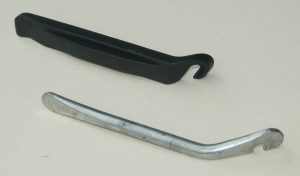 | Used to lift the tire off and to access the inner tube of a tire. |
Several parts of a manual wheelchair may require maintenance. We discuss these maintenance checks below. If you find anything wrong with your wheelchair, contact your wheelchair service provider.

Weekly maintenance
Tire inflation
To maximize pushing efficiency, it is important that your tires are always properly inflated. Weak research evidence suggests that tires deflated by more than 50% result in using more energy when pushing. However, it must also be noted that softer tires perform better on soft surfaces, such as grass or gravel. For general daily use, tires should always be inflated to the recommended values indicated on the side of the tire.
There are two ways to check tire pressure:
- For a more accurate reading, use a standing bicycle tire pump with a gauge.
- If you do not have a pump with a gauge, press down firmly on your tire with your thumb. If it presses in at all, it requires inflation.
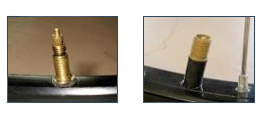
Types of valves: Presta (left), Schraeder (right)
The amount of air required for your specific tire is indicated on the side of your tire. To inflate your tire, a standing pump, a gas station pump, or a hand pump may be used. Note that most hand pumps are not able to inflate tires over 50 psi; a high-pressure hand pump is required for tires. In addition, gas station pumps are only able to pump up Schraeder valves as Presta valves require an adaptor.
Refer to our article on Manual Wheelchairs for more information!
Cushion
Your cushion is essential to maintaining a good seated posture and for skin health. To ensure that your cushion is in its best shape, inspect the cushion and cover on a weekly basis. When inspecting the cushion cover, look for any holes, signs of wear, or flaking on the underside of the cushion, and make sure the zipper is working properly.
Maintaining your cushion depends on what kind of cushion you have:
 For gel cushions: knead the gel from outside to inside. Ensure that the gel is redistributed, and that gel is present under areas of high pressure (e.g., in the area of your sit bones). In addition, ensure that there are no leaks in your cushion.
- For foam cushions: check that the foam is not breaking down or crumbling anywhere.
- For air cushions: ensure that your cushion is properly inflated. Check for leaks. If you think your cushion may have a leak, submerge it underwater and check for bubbles.
 For gel cushions: knead the gel from outside to inside. Ensure that the gel is redistributed, and that gel is present under areas of high pressure (e.g., in the area of your sit bones). In addition, ensure that there are no leaks in your cushion.
Monthly maintenance
Cushion and cushion cover
Keeping your cushion clean is important, as dirt on the cushion may lead to skin breakdown, and may leave a smell on your cushion. Once a month, wipe down the cushion with a clean damp cloth and soap. Wash the cushion cover in a washing machine, and follow the instructions in the cushion guide. Make sure to hang dry the cover, as placing the cushion cover in the dryer may result in shrinkage which may result in the cover being too small for your cushion.
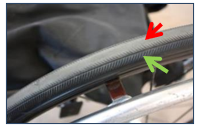
Intact (green) and worn out (red) tread on a wheelchair tire.15
Tires
The tires are a key component of the wheelchair subjected to daily wear. Inspect your tires once a month to make sure they are in good shape. Look for any signs of wear, cracks, bulges, looseness, damage, or flat spots.
Wheel bearing
The wheel bearings are located within the hub of the rear tire, and help to allow the wheel to turn freely and smoothly. Bearings normally wear out over time with use. You will know it is time to replace a bearing if you start hearing a knocking, or more infrequently, a squeaking sound as you wheel. If you suspect that you need your wheel bearing replaced, contact your local wheelchair service provider.

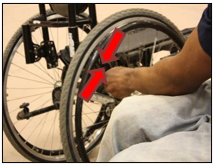
The wheel bearing should be tightened to a happy medium: a wheel bearing that is too loose may result in side to side movement of a wheel, while a wheel bearing that is too tight may result in additional resistance, resulting in an increased amount of energy spent while using your wheelchair. To check that the wheel bearings are not too tight or too loose, lift one side of the wheelchair up and spin the wheel. The tire should spin easily and should not slow and stop quickly after being spun. After the wheel stops spinning, it should spin backwards a little and should not wiggle side to side too much.
Large wheel axle
Rear wheels may be fixed (i.e., not removable) or quick release (i.e., removable). To ensure that the wheels are in place and are not loose, wiggle the wheel in all directions. If you have a fixed axle, there should be no play in the wheel. If you have a quick-release axle, some play is acceptable.
If you have a quick-release axle, test the release mechanism and ensure that the wheel securely locks back in place. A wheel that does not latch back in securely may result in an accident and should be addressed as soon as possible.
Wheel alignment – wheelchair tracking
When looking at your wheelchair from above, the two rear wheels should be parallel to each other. Having wheels that are misaligned may result in greater energy expenditure and veering of the wheelchair when pushing. Needing to constantly correct for a veer when pushing may result in reduced control over the direction that a wheelchair is moving in, a strain on one arm and/or an increased use of energy.
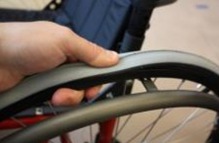
To check whether your tires are aligned, roll through a puddle of water and allow the wheelchair to coast. The wheelchair should maintain its direction, and the tracks of the chair should be straight.
Spokes
 Spokes are attached from the wheel rim (outer part of the wheel) to the hub (center part of the wheel), and help to distribute the forces of wheeling, such as the weight of the user, wheeling over surfaces, and braking. The spokes on a wheel act to prevent the tire from collapsing and adds stiffness to a wheel by acting as an anchor for the hub of the wheel.
When inspecting your spokes, you want to check that none of the spokes are bent and that there is enough tension in the spokes. Having enough tension in each of the spokes is particularly important, as having one loose spoke will lead to others becoming loose. Signs of loose spokes include a faint metallic snapping sound as you move. To check tension in the spokes, you have two options:
- Squeeze the spokes in pairs around the entire wheel. If a spoke gives when being squeezed gently, it may be loose.
- The ping test: spin the wheel and hold a pencil against each spoke. You should hear a normal pinging sound. Any spoke that sounds off indicates a loose spoke.
Wheel locks
Casters

Caster stem that is not aligned with the caster wheel.19
Casters are the small wheels found on the front of the wheelchair that help to stabilize the wheelchair. Begin by inspecting your casters for wear, cracks, looseness, tears, and bulges.
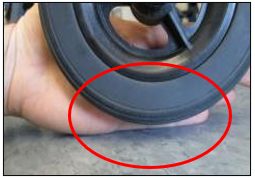
An example of a floating caster. Note the space between the bottom of the wheel and the ground.18
Secondly, to ensure that the casters are effectively stabilizing the wheelchair, check that both caster wheels are in contact with the floor and that the caster stem is aligned vertically. As the casters are required for maneuvering, it is important to ensure that they are able to turn freely around the axle. Check the casters for fluttering, or a shimmy/rapid vibration of the casters when moving.
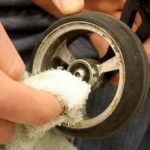
Clean the caster wheel. Remove any dirt, lint, or hair that may have been collected in the caster axle using scissors, pliers, or tweezers. Further, clean the caster using a clean damp cloth or with a toothbrush.
Caster bearing
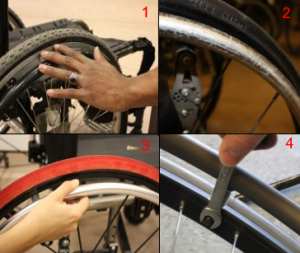
1. Inspect for wear. 2. An example of a handrim with scratches. 3.Inspect the tightness by pulling out on the hand rim. 4. Tighten as necessary.21
 Like the rear wheel, casters consist of wheel bearings to ensure smooth rolling. To check that the bearings are at a happy medium in tension, spin the caster wheels and the caster assembly, and push the caster side to side. Grinding and excessive play in the caster bearings are indicative of a problem.
Handrim
The handrims are rings connected to the rear wheel by bolts, and are used to propel the wheelchair. Most handrims are made out of plastic or metal (e.g., aluminum, steel), and may be coated in vinyl for extra grip. It is recommended to inspect your handrims monthly for wear, dents, cracks, or bends – they should be smooth all around. In addition, make sure that the hand rims are not loose. If loose, try tightening the bolts that connect the handrims to the wheel.
Frame
1. Common weld points.
2. Inspect the weld points.
3. Example of a cracked weld.22
Wheelchair frames consist of a series of metal tubes that have been welded together. Each month, check the welds to make sure that the tubes are held together. Inspect the frame for cracks or fractures. In addition, wipe down the frame each month with a clean damp rag. A toothbrush may be used to remove more difficult dirt. Avoid using a hose, power washer, or washing your wheelchair in the shower as it may cause the bearings to rust.
Nuts and Bolts
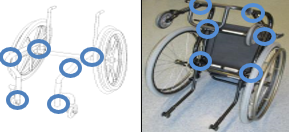
Common sites of nuts and bolts on manual wheelchairs.23
There are many nuts and bolts used on a wheelchair to hold various parts together. Loose nuts and bolts on your wheelchair may not only lead to rattling noises, but may not hold the part correctly and may fall out. Check the nuts and bolts on your wheelchair, and tighten them if loose. Make sure not to over tighten the nut or bolt, as it could damage the part or increase wheeling resistance.
Backrest
 As the backrest is used to support your sitting posture and can impact your skin health, it is important to check that it is in good shape. To do so, check the upholstery for tears, wear, stretching, or metal parts that have poked through. If you have a rigid back, check that the backrest does not wiggle and is tightly secured. In addition, make sure that the backrest height is level. It is possible for a backrest bracket to become loose, resulting in one side of the backrest being higher than the other.
If you have an adjustable sling back, observe the tension of the backrest as it may stretch over time. Adjust the back as needed.
Foot support
The foot support is often the first part of the wheelchair that comes into contact with obstacles. For example, it may be used to help open doors, act as bumpers, and may be scraped along the ground. As the foot support is used to help maintain posture, it is important to keep it intact. Inspect the footrest to ensure that it is not loose. If you have swivelling foot rests, ensure that they swing away with ease, and can latch back properly. Also be sure to check the footrests for wear on the pins, bolts, and bushing, and tighten these parts if necessary.
 Maintaining a power wheelchair may seem intimidating given the integration of electronics, but most activities are fairly simple. Below we discuss the tasks you should complete with your wheelchair.
Refer to our article on Power Wheelchairs for more information!
Daily
Battery
Properly charging your battery is important in maintaining its health. Do not charge the battery too frequently with little use, or let your battery completely die. If you are using your wheelchair every day, charge your batteries every night. Batteries should be charged for 8-12 hours, even though the charging lamp has gone off.
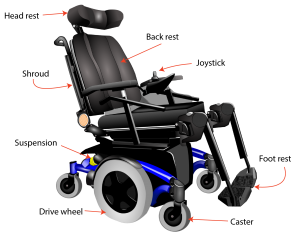
Plastic shrouds
 Shrouds are the plastic coverings that protect the electronics and the battery of the wheelchair from dirt and moisture. To check them, make sure that they are present and intact. Try to jiggle the shrouds around to ensure they are not loose.
Brakes
The brakes are essential to safe use of your wheelchair. On a power wheelchair, the brakes are connected to the motor. When you drive, they automatically disengage, and when you stop, they automatically re-engage with an audible clicking sound. If you suspect something wrong with your brakes, try the following:
 Turn down the speed of your wheelchair
- Push the joystick forward and then stop. Upon stopping, you should hear a clicking sound. This indicates that your brakes are working.
 Turn down the speed of your wheelchair
Weekly
Tire inflation, Cushion inspection
Similar to manual wheelchairs, pneumatic tires and cushions should be inspected on a weekly basis to optimize their performance. Refer to the tire inflation and cushion inspection instructions in the manual wheelchair maintenance section above.
Motor
The motor is an integral part of the wheelchair, as its job is to convert power from the battery into energy to move the chair. It is normal for the motor to make some noise when it is being used. Try to become accustomed to what your motor sounds like so you are able to detect any changes. Over time, it is normal for the motor to become a bit louder; however, excessive noise may be indicative of an issue. If you notice any sounds that you are unable to recognize, contact your wheelchair provider.
Controller and joystick
The controller of a wheelchair often consists of a power button, a screen, and a joystick. It is the interface used to control the driving, speed, and positioning of your wheelchair. Before inspecting your controller, make sure that it is switched off. There are two main aspects of inspecting the controller:
- Check the joystick and the rubber connection between the joystick and the control for any cracks or wear. This protective covering acts to keep dust, dirt, and moisture out of the electronics. And so damage to the covering may eventually lead to failure of the control.
- Check the wiring of the joystick. Ensure that none of the connecting cables are frayed or showing through the insulation.
Monthly
Cushion, cushion cover, and foot plates.
Cushions, cushion covers, and footplates should be maintained and inspected at least once a month. The maintenance and checking process for these items are similar to manual wheelchairs. For more information, refer to the section “What maintenance and checks should I do for my manual wheelchair?” above.
Tire
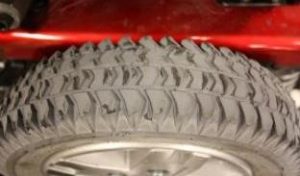 The treads on your tire play a key role in maintaining traction and maintaining the stability and maneuverability of the wheelchair. Some tires may have less tread than others; note how much tread your tire starts off with. Check the tire treads monthly to ensure that they are not worn.
Caster
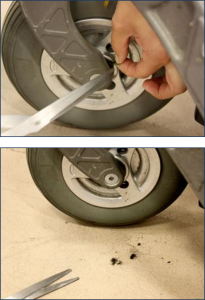 The axles of the front caster wheels of the wheelchair are the lowest to the ground, and thus are susceptible to picking up hair, dust, lint, and dirt. Buildup on your axles can lead to premature wearing and increased rolling resistance. For example, hair wrapped around the caster wheel can lead to breakage. Using a pair of scissors, tweezers, a toothbrush, or pliers, remove debris from the caster.
Frame
Inspect the frame and weld points on the wheelchair and ensure there are no cracks. Make sure all fasteners are appropriately tight.
Backrest
The backrest of your wheelchair is important for support and your posture. Maintaining the backrest of a power wheelchair is similar to a manual wheelchair. Refer to the manual wheelchair section for further details.
Wiring and electronics
There are many wires throughout a powered wheelchair that are essential to making the wheelchair move. To safeguard the use of your wheelchair, make sure that all of the wires are in place and free from dirt and corrosion. If you notice any exposed wires or corrosion on the wires, take it to a dealer. If wires are hanging out or are in the way of your day-to-day use, it may be beneficial to connect the wires to a support (e.g., armrest, frame, etc) as shown below.
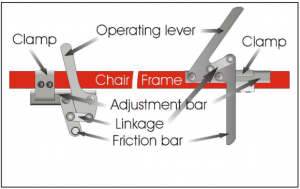
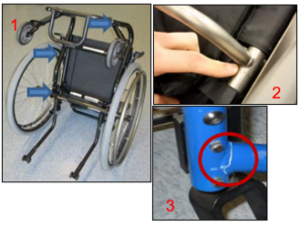
Diagram of the wheel locks and the bolts that can be adjusted.31
Wheel lock not locking wheels
If your wheelchair is still moving despite your wheel locks being on, first check to see if your wheels may be underinflated. Try inflating your tires to the recommended pressure. If the wheel locks are still ineffective, try adjusting the position of the wheel lock by loosening the bolts securing the clamp on the frame of the wheelchair. Slide the adjustment bar as required, and tighten up the bolts. If your brakes look like they are worn, contact your local wheelchair service provider for a replacement.
Wheelchair Keeps veering to one side

One way to check tracking is by rolling through a puddle of water. Take note of the water trail made from the wheels. Are they parallel and straight?32
As you push your wheelchair, it should travel straight forward. However, your wheelchair may sometimes veer, or pull to one side, when you intend to go forward in a straight line. Before trying to resolve this issue, ensure that your chair is actually pulling one way, and that it isn’t related to an uneven surface or unequal strength. To do this, propel your wheelchair forward as far as you can with one push. Note any deviations to a side. Turn around, and perform the same action in the opposite direction. This is to cancel out the effect of an uneven surface. If you have identified a pulling of your wheelchair in one direction, something is causing poor tracking. There are multiple reasons why your wheelchair may veer to one side when you are pushing.
- Caster:
- Vertical alignment of the caster may be off.
- Caster fork may be misaligned.
- Hair may be wrapped around one of the casters.
- Tire:
- Check to ensure that the tire pressure on both sides are equal.
- Make sure that axles are mounted symmetrically on the frame.
- Frame:
- Make sure the frame is sitting evenly. Check that the footplates are sitting at an equal height.
Patching a flat inner tube
If you are using a wheelchair with air-filled tires, chances are you may encounter a flat tire. If you only have a patch kit on you, follow the instructions below on how to fix a tire with a patch kit. Depending on the extent of the damage done on your inner tube, a patch may suffice. Patch kits, tires, and inner tubes may be purchased from bicycle shops or wheelchair vendors.
- Deflate the tire as much as possible.
- Remove the inner tube from the tire. To do this, insert a tire lever under the edge of the tire above a spoke. Secure the hooked end of the tire lever around a spoke. Insert a second lever a few inches away from the first, and push down on it until that area of the tire flips over the rim. Slide this lever around the tire in a clockwise direction until the tire is removed.
- Remove the inner tube under the tire.
- Determine where the leak is by over-inflating the tire and listening/feeling for the air escaping. If you are unable to successfully locate the leak, submerge the air-filled tire underwater and watch for bubbles.
- Once you have identified the hole, mark it with a pen or marker.
- Use the sandpaper in the patch kit to sand the area around the hole. This will help the patch adhere to the tube better.
- Let the air out and apply a thin layer of rubber cement over the hole. Make sure you spread the cement over an area large enough to encompass the patch. Wait for the cement to dry.
- When the cement is dry, apply the patch firmly to the inner tube. Now we are ready to put the tire back together.
- Inflate the tube until it holds its shape.
- Find the valve and align it with the valve hole on the rim. Use your hands to knead the tire back onto the rim. You may need to use your tire levers to help put the last bit of the tire back onto the rim, but be careful not to pinch the inner tube.
- Re-inflate the tube to the recommended value on the tire wall.
To replace an inner tube instead of patching it, skip steps 4-8.
Fixing a leaky air cushion
If you notice a leak in your air cushion, it can be easily repaired with a patch. While ROHO cushions come with a patch, other brands may require you to order some from the manufacturer.
- Determine where the leak is. To do so, inflate your cushion and submerge it underwater. Where you see bubbles is indicative of the leak spot.
- Mark the hole by placing a toothpick into the hole.
- Allow the cushion to completely dry by laying it out on a towel.
- Clean the area around the hole using the alcohol wipe provided. Let it dry.
- Peel the backing off of the patch and place it over the hole. Firmly press on the patch until there is a good seal.
- Reinflate the cushion
Maintaining your wheelchair is important to its longevity and its performance. Completing various inspections and simple maintenance tasks on a regular basis is fairly simple, and can be done by yourself or a family, friend, or caregiver.
It is best to discuss all wheelchair modifications and big maintenance with your wheelchair provider should you find any major issues. This article is not intended to replace yearly professional wheelchair maintenance/tune-ups.
For a review of how we assess evidence at SCIRE Community and advice on making decisions, please see SCIRE Community Evidence.
Evidence for “Why is wheelchair maintenance important” is based on:
Chen WY, Jang Y, Wang JD, Huang WN, Chang CC, Mao HF, Wang YH. Wheelchair-related accidents: relationship with wheelchair-using behavior in active community wheelchair users. Archives of physical medicine and rehabilitation 2011;92(6):892-898.
Evidence for “What maintenance should be done for a manual wheelchair?” is based on:
Boninger, M., Kirby, R.L., Oyster, M., Pearlman, J. Cooper, R.A.,…Toro, M. (2017). Wheelchair maintenance training program: Clinician’s reference manual. Retrieved from: http://www.upmc-sci.pitt.edu/node/924
Golden, J., Colescott, D. (2017). Manual wheelchair maintenance checklist [PDF]. Retreived from: http://sci.washington.edu/summit2017/MANUAL_WHEELCHAIR_MAINTENANCE_CHECKLIST-SCI_Summit2017.pdf
Manual Wheelchair Maintenance Checklist.(n.d.). Retreived from: http://sci.washington.edu/summit2017/MANUAL_WHEELCHAIR_MAINTENANCE_CHECKLIST-SCI_Summit2017.pdf
Model systems knowledge translation center (2018). Maintenance guide for users of manual and power wheelchairs [PDF]. Retrieved from: https://msktc.org/sci/factsheets/maintenance-guide-users-manual-and-power-wheelchairs
Sawatzky BJ, Miller WC, Denison I. Measuring energy expenditure using heart rate to assess the effects of wheelchair tire pressure. Clinical Rehabilitation 2005;19(2):182-7.
Evidence for “What maintenance should be done for a power wheelchair?” is based on:
Model systems knowledge translation center (2018). Maintenance guide for users of manual and power wheelchairs [PDF]. Retrieved from: https://msktc.org/sci/factsheets/maintenance-guide-users-manual-and-power-wheelchairs
Boninger, M., Kirby, R.L., Oyster, M., Pearlman, J. Cooper, R.A.,…Toro, M. (2017). Wheelchair maintenance training program: Clinician’s reference manual. Retrieved from: http://www.upmc-sci.pitt.edu/node/924
Evidence for “What are some simple repairs I can do?” is based on:
Denison, I. (2006). Wheelchair maintenance series [PDF]. Retrieved from: http://www.vch.ca/Documents/Equipment-Wheelchair-Maintenance-Series.pdf
Image credits
- Crescent brand 8-inch adjustable wrench. ©Rico402. CC0 1.0
- WD-40 Specialist Dirt & Dust resistant dry lube PTFE spray. ©WD-40 2020
- Screw head – slotted. ©Inductive load. Public domain.
- Diagram of a screw head – Phillips. ©Inductive load. Public domain
- Diagram of a screw head – Pozidrive. ©Inductive load. Public domain
- Diagram of a screw head – Robertson square drive. ©Inductive load. Public domain
- Diagram of a screw head – Torx. ©Inductive load. Public domain
- Construction tool hardware construct allen key. ©Max Pixel. CC0 1.0
- Lezyne and Topeak Road Morph bike pumps. © CC-BY-2.0
- Different kinds of handicapped equipment. © Modified by the SCIRE Community Team
- Tyre Levers ©Ian Harvey. CC0
- Checking tire pressure. ©Manual Wheelchair Maintenance Program. CC-BY-NC-ND-3.0.
- Types of tire valves. ©Manual Wheelchair Maintenance Program. CC-BY-NC-ND-3.0.
- Checking cushion cover. ©Manual Wheelchair Maintenance Program. CC-BY-NC-ND-3.0.
- Tire treads. ©Manual Wheelchair Maintenance Program. CC-BY-NC-ND-3.0.
- Checking the wheel bearing. ©Manual Wheelchair Maintenance Program. CC-BY-NC-ND-3.0.
- Inspecting spokes. ©Manual Wheelchair Maintenance Program. CC-BY-NC-ND-3.0.
- Floating caster. ©Manual Wheelchair Maintenance Program. CC-BY-NC-ND-3.0.
- Misaligned caster stem. ©Manual Wheelchair Maintenance Program. CC-BY-NC-ND-3.0.
- Cleaning caster. ©Manual Wheelchair Maintenance Program. CC-BY-NC-ND-3.0.
- Inspecting handrim. ©Manual Wheelchair Maintenance Program. CC-BY-NC-ND-3.0.
- Inspecting wheelchair frame. ©Manual Wheelchair Maintenance Program. CC-BY-NC-ND-3.0.
- Nuts and bolts locations. ©Manual Wheelchair Maintenance Program. CC-BY-NC-ND-3.0.
- Checking backrest. ©Manual Wheelchair Maintenance Program. CC-BY-NC-ND-3.0.
- Modified from: Wheel isolated ©MBGX2, Pixabay License
- Inspecting shrouds. ©Power Wheelchair Maintenance Program. CC-BY-NC-ND-3.0.
- Checking the braking mechanism. ©Power Wheelchair Maintenance Program. CC-BY-NC-ND-3.0.
- Tire treads. ©Power Wheelchair Maintenance Program. CC-BY-NC-ND-3.0.
- Caster wheels. ©Power Wheelchair Maintenance Program. CC-BY-NC-ND-3.0.
- Tying up wires. ©Power Wheelchair Maintenance Program. CC-BY-NC-ND-3.0.
- Wheel lock. ©Ian Denison. Used with permission
- Wheelchair tracking. ©Manual Wheelchair Maintenance Program. CC-BY-NC-ND-3.0.
